How to Clean Grout Without Damaging the Surrounding Surface
August 18, 2026
Grout rarely sits by itself. Every joint touches tile or stone, may meet a tub, countertop, cabinet, metal trim, or sealant, and can be part of a floor, wall, shower, backsplash, or outdoor installation. A cleaner that changes the grout can also spread onto those neighboring materials. That is why the right method begins with the whole assembly rather than the color of the grout line.
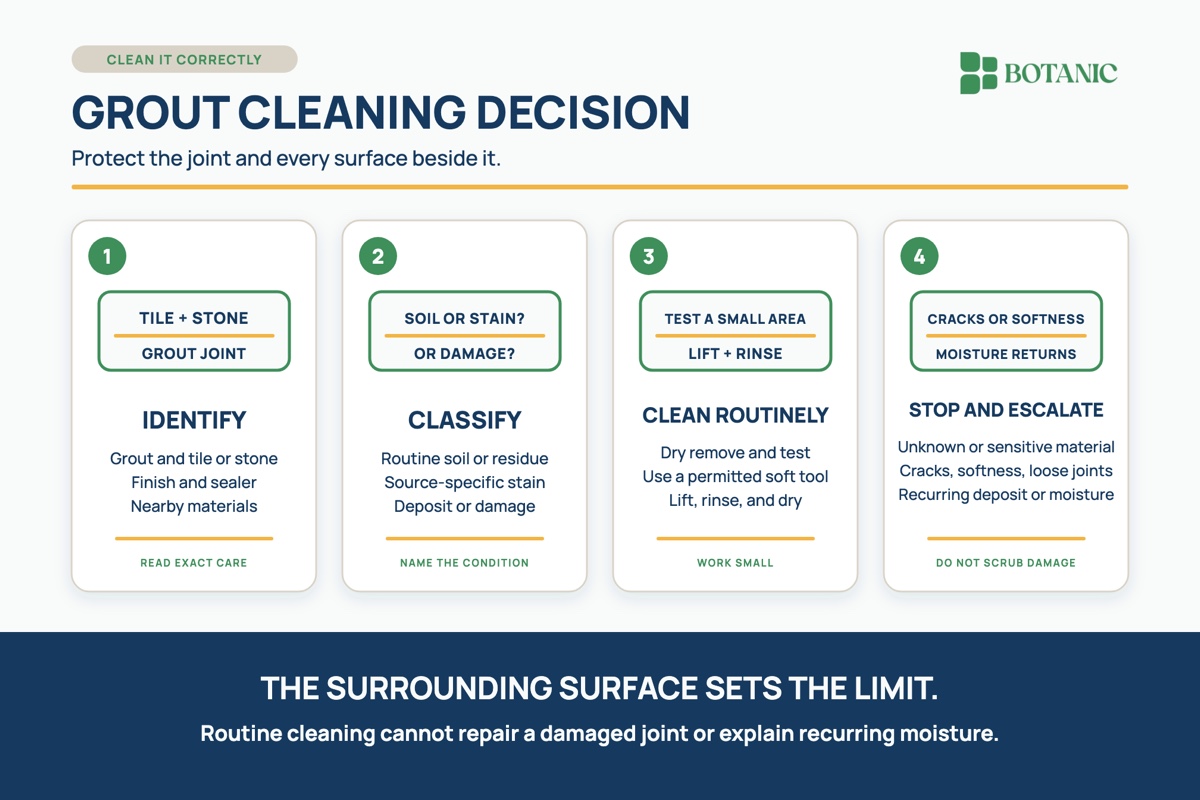
Before you scrub, identify what you are looking at and what condition it is in. Routine surface soil, soap residue, a localized stain, a white mineral deposit, cracked grout, and a soft or loose joint are not six versions of the same cleaning problem. They call for different decisions, and some should not be treated with more cleaner or pressure.
Identify the grout and every surface beside it
Start with installation records, product packaging, a builder or installer file, a maintenance record, or the manufacturer when that information is available. Try to identify the grout family, color, age, sealer or coating, surrounding tile or stone, and any nearby finish that the cleaning solution could touch. Common cementitious grouts and epoxy or other resin-based grouts do not necessarily share the same care instructions.
Do not identify the neighboring material by appearance alone. A stone-look tile may be porcelain, while an ordinary-looking tile may be acid-sensitive natural stone. Glazed ceramic, unglazed tile, marble, limestone, slate, metal trim, acrylic, fiberglass, wood, painted surfaces, and flexible sealant can all set different limits for moisture, acidity, alkalinity, solvents, abrasion, and dwell time.
If the materials or finish are uncertain, begin only with a low-risk dry step, such as vacuuming loose debris with a suitable non-scratching attachment. Pause before adding cleaner until you can find the controlling care guidance or obtain qualified advice.
Classify the condition before choosing a method
Routine soil usually sits at or near the surface and changes gradually in traffic lanes, cooking areas, or places where body-care residue collects. A localized stain may have a clear source and a defined edge. A sticky or hazy surface may be leftover cleaner that was not fully rinsed. White powder can be dried residue, but it can also be efflorescence associated with moisture moving through a cement-based installation.
Cracks, missing sections, loose joints, persistent dampness, a soft or crumbling texture, movement, or repeated white deposits are stop conditions. Cleaning cannot repair a failed joint or identify the source of moisture. Photograph the area, note when and where it appears, and ask the installer, grout or tile manufacturer, or an appropriate tile professional to assess it. Do not seal over an unexplained moisture or deterioration problem.
Use a controlled routine-cleaning sequence
- Remove loose soil first. Vacuum or sweep with a tool that the tile, stone, grout, and finish can tolerate. Dry removal keeps grit from becoming abrasive mud.
- Read both sets of directions. The cleaner label and the care instructions for the grout, tile or stone, sealer, and nearby finishes all matter. Follow the strictest compatible limit for dilution, application, ventilation, protective equipment, dwell time, rinsing, and disposal.
- Test a small, inconspicuous area. Test the complete method, including the cleaner, tool, pressure, time, rinse, and drying step. Let the area dry fully before judging color, sheen, texture, haze, or residue.
- Work in a small section. Apply only the amount directed. Use a soft cloth or non-scratching brush if the manufacturers permit it, and keep the tool on the joint as much as practical. More pressure is not a substitute for the correct chemistry or enough time.
- Lift away the dirty solution. Do not keep spreading cloudy liquid across the installation. Remove it with an allowed cloth, mop, wet extraction method, or other directed tool, then rinse as required with clean water.
- Dry and reassess. Let the area dry completely before deciding whether the grout is clean, stained, discolored, or damaged. Wet grout can look darker, and residue may become visible only after the water evaporates.
Let the surrounding surface set the cleaning limit
The Tile Council of North America explains that cementitious grout is alkaline and can be dissolved by acids. It recommends conventional cleaning before any more aggressive intervention and notes that acidic treatment can lead to regrouting. Natural stone adds another boundary. The Natural Stone Institute explains that acids can dull or etch calcareous stone such as marble or limestone and that abrasive powders or creams can scratch some stones.
This is why vinegar, an abrasive paste, a stiff brush, a toilet-bowl cleaner, or an internet recipe cannot be treated as a universal grout method. Even when an ingredient changes a deposit, it may also change the grout, tile, stone, sealer, metal, or nearby finish. Do not mix cleaning products. Do not move from a mild method to a stronger acid, alkali, solvent, bleach product, pressurized steam, or powered brush unless the exact installation and product directions support that choice.
Rinsing and removal are part of cleaning
Grout can hold soil and cleaner residue within its textured surface. The Tile Council notes that even a suitable alkaline cleaner can leave a sticky film when it is not properly rinsed. Use clean rinse water when the directions call for it, change the water before it becomes visibly dirty, and remove the rinse solution instead of leaving it to dry over the joint.
On a floor, an allowed wet vacuum or extraction tool can lift the dirty solution instead of redistributing it. On a wall or small area, clean cloths may be more practical. Whichever method you use, keep water away from open joints, loose tiles, damaged sealant, unfinished edges, cabinetry, walls, or other places where the assembly is not meant to be saturated.
Know when a stain needs a different decision
If routine cleaning leaves one area discolored, identify the likely source before repeating the process. Cooking oil, dye, rust, body-care residue, hard-water minerals, old cleaner, and material changes do not respond to one universal treatment. Use only a stain method supported for the exact grout, surrounding surface, sealer, and source of the mark.
If the source is unknown, the joint is valuable or specialty work, the stain has penetrated, or the proposed treatment could change the surface, stop and consult the manufacturer or a qualified tile or stone professional. A stain that remains after careful routine cleaning is not permission to keep increasing strength, time, heat, or abrasion.
A four-part grout decision
- Identify. Confirm the grout, neighboring material, finish, sealer, and care instructions.
- Classify. Separate routine soil or residue from a specific stain, recurring deposit, crack, softness, looseness, or moisture concern.
- Clean routinely. Remove dry soil, test the complete approved method, work in a small section, lift the dirty solution, rinse as directed, and dry fully.
- Stop when the condition changes. Escalate unknown materials, acid-sensitive stone, damaged joints, persistent moisture, recurring white deposits, or a stain that needs source-specific treatment.
The goal is not to make every joint look newly installed. It is to remove the soil the assembly can safely release while preserving the grout and every material around it. When a careful routine method reaches its limit, stopping is part of good care.
Separate routine soil from a condition problem
Routine surface soil is different from a cracked, loose, soft, deteriorating, or repeatedly damp joint. Cleaning can address removable soil. It does not repair the installation, stop moisture, restore every color change, or replace a professional assessment.
Identify the grout and the neighboring tile or stone before choosing a cleaner. Use only a permitted soft tool and product, lift the dirty solution, rinse as directed, and let the area dry before judging the result. Stop for unknown materials, damage, acid-sensitive stone, or a recurring moisture problem.
When the residue is mineral film rather than ordinary soil, compare the diagnosis with Why Hard Water Leaves Spots and Mineral Film.
With care,
Hazel